In this post we are going to learn how to bind data to DataGrid in WPF(Windows Presentation Foundation)
Create new project named as DataGridSample

To show a basic data grid, just drop a DataGrid control to your view and bind the ItemsSource to a data table
The DataGrid provides a feature called AutoGenerateColumns that automatically generates column according to the columns of your data datatable. It generates the following types of columns:
- TextBox columns for string values
- CheckBox columns for boolean values
- ComboBox columns for enumerable values
- Hyperlink columns for Uri values
MainWindow.xaml
<Grid>
<DataGrid AutoGenerateColumns="True" Height="225" HorizontalAlignment="Left" Margin="28,21,0,0" Name="dataGrid1" VerticalAlignment="Top" Width="408" />
</Grid>
MainWindow.xaml.cs
SqlConnection cn = new SqlConnection("Data Source=.;database=Practice;trusted_connection=true");
public MainWindow()
{
InitializeComponent();
}
private void Window_Loaded(object sender, RoutedEventArgs e)
{
cn.Open();
SqlDataAdapter da = new SqlDataAdapter("Select * from Employee", cn);
DataSet ds = new DataSet();
da.Fill(ds, "Employee");
dataGrid1.ItemsSource = ds.Tables["Employee"].DefaultView;
}
Result Window

Alternatively you can define your columns manually by setting the
AutoGenerateColumns property to False. Here we can add following type of columns
DataGridCheckBoxColumn
DataGridComboBoxColumn
DataGridHyperlinkColumn
DataGridTemplateColumn
DataGridTextColumn
MainWindow.xaml
<DataGrid AutoGenerateColumns="False" Height="173" HorizontalAlignment="Left" Margin="12,12,0,0" Name="dataGrid1" VerticalAlignment="Top" Width="292" ItemsSource="{Binding}">
<DataGrid.Columns>
<DataGridTextColumn Binding="{Binding EmpId}" Header="Id" />
<DataGridTextColumn Binding="{Binding EmpName}" Header="Name" />
<DataGridTextColumn Binding="{Binding Designation}" Header="Designation" />
<DataGridTextColumn Binding="{Binding Location}" Header="Location" />
<DataGridCheckBoxColumn Binding="{Binding IsActive}" Header="IsActive" />
</DataGrid.Columns>
</DataGrid>
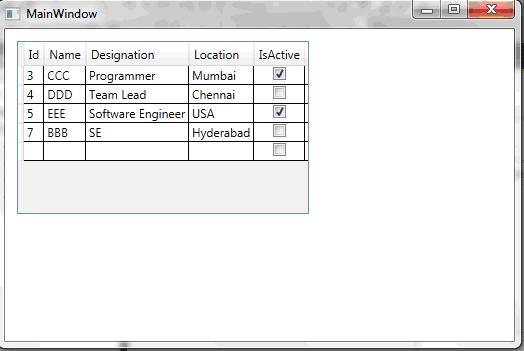
Result Window
Result Window